This step by step guide will create your own key for signing and encrypting email messages for free with The GNU Privacy Guard (GPG).
The GNU Privacy Guard, or just GnuPG or GPG, is a complete and free implementation of the OpenPGP standard. GPG can be used to sign and encrypt email messages and other data and communication.
If you implement GPG for use with email, then you can digitally sign your message, so your recipient will know, that the message has in fact been sent by you. The recipient will also know, that your messsage has not been modified. If you have the public key of the recipient, then you can encrypt and sign your message. You and your recipient can now safely assume, that your message has been protected against surveillance systems and other kinds of breach of privacy.
Create your new signing and encryption key.
The following GPG command will create a new key, that will be based on your selections from the menu. You will want RSA keys for signing and encryption. You might not want the key to expire. You will want maximum RSA key strength. Enter your name as it appears, when you send email. Enter your email address. Enter a passphrase. The passphrase should not just be a single password, but rather a phrase or complex password.
$ gpg --full-generate-key
You have now created a GPG key, that can be used for signing and encrypting data and communication. It has been inserted into the GPG key ring on your computer. If you did not have a key ring, then one has been created for you in a hidden directory in your home directory. You might want to ensure, that it is backup up.
$ ls .gnupg
The following command lists the key, and other keys, that exist in your key ring. The key will have a key for signing, a user identification and a subkey for encryption. The email address is used for identifying a key, if you later should want to make changes.
$ gpg --list-keys
The following command lists other options, that will help you find out, what you can do with the GPG command line tool.
$ gpg --help
Import your secret key into your email client.
The final step is to import your new key into your own email client, such as Thunderbird Mail. This key, which is your secret key and not the shared public key, will then be used by your email client to sign your messages. If you also have the public key of your recipient, you can also encrypt your messages.
The following example will export the secret key, that is identified by the email address , to a file private.gpg, that can be imported to your email client. You will need to enter the passphrase, that you entered during the creation of the key.
$ gpg --output private.gpg --export-secret-key
If your email client is Thunderbird Mail, you can import your private GPG key as an OpenPGP key. In Thunderbird Mail 78 this is done by going to Tools, OpenPGP Key Manager, File, Import Secret Key(s) From File and Select File To Import. Open private.gpg. Thunderbird Mail now confirms, that it found your key. Continue and enter the passphrase, that you entered during the creation of the key. Continue and you will now return to the key manager, that lists all keys, that is loaded into Thunderbird Mail. Your GPG key are now imported, but you need to configure Thunderbird Mail to associate your GPG key with your email account. Go to Edit, Account Settings, End-To-End Encryption and find the OpenPGP section. Select your key, which is shown by its key fingerprint. You can now sign and encrypt mail with GPG.
If you are trying to import your private key into Thundebird Mail, but get the error message “Error! Failed to import file.”, then should check, if you accidently exported your public key instead of your private key.
Note: Thunderbird Mail has its own PGP built-in system, that replaces the former EnigMail add-on, and stores its keys in its own key ring, that is different from the main GPG key ring. Thunderbird can also create a key for you, but in this example, you will create your own key with GPG and import it.
Export your public key to your recipients.
You can now generate a public key from your private key. If you share the puplic key with your recipient, then your recipient can import it and it will be used for validating your signatures and encrypting messages to you. I wrote a guide about this in How to import a GNU Privacy Guard (GPG) public key into email client.
The following example will export a public key from the key, that is identified by the email address . The public key will be written in the default GPG format to the file example.gpg.
$ gpg --output example.gpg --export
The following example will export a public key from the key, that is identified by the email address . The public key will be written in armored text format to the file example.pub. This format is can be used for copy and paste operations.
$ gpg --output example.pub --armor --export
The file can now be shared with your recipient, who can import it to an email client, such as Thunderbird Mail, that support signing and encryption with GPG. You can safely share your public key via email or other medium. The public key can only be used to encrypt messages to you. The message can only be decrypted by the one, who has the private key.
Sign and encrypt your message.
If you use Thunderbird Mail, then you can sign and encrypt your email message with GPG by creating a new message as you would normally do. Then go to the Security drop down menu and select Require Encryption. Enter the recipient, that you also have a public key for, and finish your message as normal. When you send your message, it will be signed and encrypted. When you have sent it, you can confirm, that is was in fact signed and encrypted by going to the folder with your sent messages and opening your sent message and opening the OpenPGP symbol.
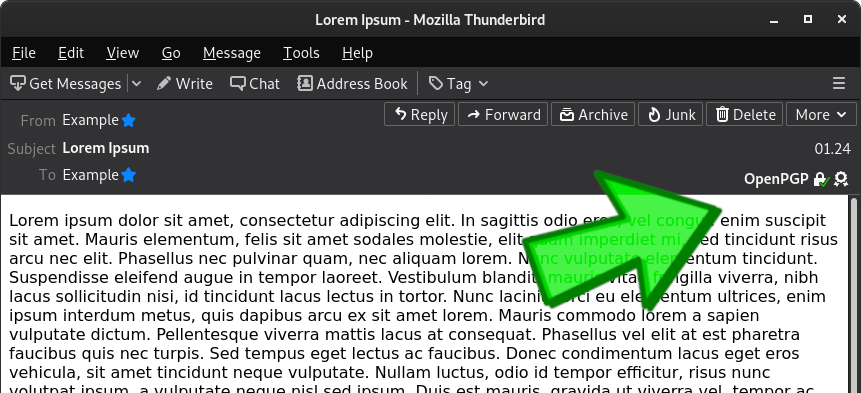
Example of a signed and encrypted email message.
The following picture is an example of a signed and encrypted message, that has been received and opened in Thunderbird Mail.
If you look in the upper right corner, you can see, that a lock indicates, that this message was encrypted, and, that a diploma indicates, that this message was signed by the sender.
Backup your GPG keys.
Your GPG keys are stored in the dot directory in your home directory. If you create a backup of this directory, then you will be able to restore it at a later time. In the example below, Zip is used to create a backup of your GPG keys. You also need to make sure, that you have stored the password for each private key, that you have. I recommend using a password manager for storing GPG passwords.
$ zip -r backups/gnupg .gnupgRestore your GPG keys.
In the example below, Unzip is used to restore your GPG keys from your backup. You have now restored your GPG keys and can use them to export keys for use in Thunderbird Mail or other applications.
$ unzip backups/gnupg.zip