These are my notes, tips and howtos about installing and maintaining FreeBSD and third party applications for FreeBSD. If you have feedback, feel free to contact me.
While Poudriere was building Electrum 4.6.2 for FreeBSD 14.4, the building stopped, when dependency check for Asyncio NOSTR client failed. The issue seems to be a version requirement. I tested building with Python 3.11 and 3.12. If you have tips, I would be happy to learn more about, how to fix this issue.
Extracting py312-electrum-aionostr-0.1.0: .......... done
py312-electrum-4.6.2 depends on package: py312-electrum-aionostr>=0.0.11,<0.1 - not found
make: stopped making "run-depends" in /usr/ports/finance/electrum
Solution
Technically, the dependency version check can be changed, which will solve the issue. This can be done in a wrapper script or manually. In both methods, the version requirement in the Makefile is substituted with a higher limit. Poudriere will compile it with no issues and Electrum runs right out. I have not tested actual connection and transaction operations.
# sed -i '' -E 's/electrum-aionostr>=0\.0\.11,<0\.1/electrum-aionostr>=0.0.11,<0.2/' $port/Makefile
However, Electrum 4.6.2 was released 2025-08-25 and has since reached 4.7.2. A better solution is probably to download and verify Electrum from the official website and then running it without installing. Electrum is a Python application and should run, if Python and necessary dependencies are installed. The procedure is published on the official website.
$ tar -xvf Electrum-4.7.2.tar.gz
$ python3 Electrum-4.7.2/run_electrum
This page is about how to install and use SpamAssassin for Sendmail on FreeBSD. Tested on FreeBSD 14.3.
What is SpamAssassin?
SpamAssassin is a filter system, that can detect spam mail. SpamAssassin is an open source project, that has been offered by Apache since 2001. The filter can be implemented as a mail filter for mail servers, such as Sendmail. Such a mail filter is also known as a milter. Unfortunately, the official documentation and the FreeBSD install instructions are rather old and outright wrong.
SpamAssassin reads the headers of email and use a set of rules to detect known spam characteristics and apply a spam score to the headers. Email clients can then use this score to identify the email as spam and move it to another inbox for spam or trash.
Below, is an example of SpamAssassin score headers in a filtered message, that spoofed a Google GMail account and presented a crypto extortion scheme.
You can filter mail folders through SpamAssassin and inspect the results in the mail client. In this example, ham and spam mail folders for Alpine is used for testing SpamAssassin manually. Alpine use the MBOX format.
$ ls mail
Ham     Spam
$ spamassassin --mbox < mail/Ham > mail/SpamAssassin
$ spamassassin --mbox < mail/Spam >> mail/SpamAssassin
$ alpine
The spam mail folder can later be used for training SpamAssassin, which can scan it regularly.
You can also save ham and spam messages as plain-text files and filter those through SpamAssassin.
Settle on a maximum spam score.
Settle on a spam score for future use in the configuration. The default is 5. If DNS block lists are unavailable due to IP address range block or rate limiting, which is common, I recommend a score closer to 3,8.
Configure SpamAssassin.
If you want SpamAssassin to learn from human marked spam, then create a directory for such database.
If DNS block lists are unavailable due to IP address range block or rate limiting, which is common, then you might want do disable the use of DNS. This is probably especially a good practice for higher volume mail servers to maintain speed.
Test Bayes learning.
Test the Bayes learning and the new settings. It is important, that the mail box format is indicated.
# sa-learn --spam --mbox /home/lightman/mail/Spam
Configure FreeBSD to start SpamAssassin.
If the spam score reaches 10, then the message will be rejected at the port.
# nano /etc/rc.conf
# grep spam /etc/rc.conf
spamd_enable="YES"
spamd_flags="-c --max-children=10"
spamass_milter_enable="YES"
spamass_milter_socket="/var/run/spamd/spamass-milter.sock"
spamass_milter_flags="-r 10 -f -u spamd -p ${spamass_milter_socket}"
# find /usr/local/etc/rc.d -name '*spam*'
/usr/local/etc/rc.d/sa-spamd
/usr/local/etc/rc.d/spamass-milter
# service sa-spamd start
# service spamass-milter start
# ls -l /var/run/spamd
total 1
srw-r--r--  1 root  wheel  0 Mar 12 02:09 spamass-milter.sock
-rw-r--r--  1 root  spamd  5 Mar  9 18:19 spamd.pid
Configure Sendmail to use SpamAssassin milter on FreeBSD.
# cd /etc/mail
# nano $(hostname).mc
# grep spamassassin $(hostname).mc
INPUT_MAIL_FILTER(`spamassassin',`S=local:/var/run/spamd/spamass-milter.sock, F=T, T=C:15m;S:4m;R:4m;E:10m')
# make && make install
# service sendmail restart
# cd
I am still testing this feature. If you have tips, let me know. Thanks.
If the server runs Dovecot IMAP server, or a similar IMAP server, it might support automatic handling of spam mail by reading mail headers, creating user spam folders and moving spam into those. The Pigeonhole Sieve plug-in for Dovecot can do this.
Configure Alpine or other mail client for handling spam.
You can now configure your mail client for handling spam. The spam features of mail clients include looking in mail headers and using this information to move the mail to a spam folder or deleting it outright.
In Alpine, you can go to “Setup”, “Rules” and “Filters”. Here, you can create filtering rules. Create a new filter. If it has an “X-Spam-Status” mail header and the the value is “Yes”, then move the message to the “Spam” folder. You can also use other spam headers and options.
This page describes the procedure for comparing images side by side by creating a montage with ImageMagick.
What is MONTAGE in ImageMagick?
MONTAGE is a utility, that is a part of ImageMagick. It can arrange images side by side and save it as a single composite image. This is used for comparing the colors or quality of cameras, filters, editing, post processing and image technology.
$ man montage
NAME
  montage - create a composite image by combining several separate
  images. The images are tiled on the composite image optionally adorned
  with a border, frame, image name, and more.
SYNOPSIS
  magick montage input-file[s] [options] output-file
OVERVIEW
  The montage program is a member of the ImageMagick(1) suite of tools.
  Use it to create a composite image by combining several separate
  images. The images are tiled on the composite image optionally adorned
  with a border, frame, image name, and more.
Create a montage with MONTAGE in ImageMagick
In this example, several images are given as input to MONTAGE. Each images is automatically rotated according to EXIF data, resized and cropped to 1:1 aspect ratio, annotated with the filename and camera model EXIF tag in bottom right corner, aligned in tiles 3×2, scaled with Lanczos filter and saved in high quality.
This page is about how to send confidential information to a non-technical recipient with the default ZIP utility, that is well-known and widely supported. This is an alternative to PGP and encryption keys, which require more technical skills and are less well-known nor supported.
What is ZIP?
ZIP is a compression and file packaging utility for FreeBSD, UNIX, Linux, Windows and MacOS operating systems. It comes with optional password encryption for compressing, packaging and protecting confidential information and documents.
Be aware, that the encryption method in ZIP is not safe against motivated and competent attacks. It is just meant to be assumed as a moderate protection like a door lock. A more secure method is used in 7-ZIP, which also produce ZIP files, but could be less widely supported.
Prepare confidential information.
Prepare the confidential message or document. In this example, it is a plain text file, but it could be a PDF document or any other type of document. Make sure, that the name of the file does not contain confidential information. It will not be protected.
$ cat confidential.txt
Dear Lightman, your password on the WOPR server has expired and has been changed to Pencil.
Encrypt and password protect confidential information with ZIP.
The confidential message is then encrypted with a password by the default compression and file packaging utility ZIP.
$ zip -e confidential confidential.txt
ZIP will create a ZIP file, that has been encrypted with the given password. It can only be decrypted by a recipient, who has the password.
$ ls confidential.*
confidential.txt
confidential.zip
Send password protected ZIP file.
You can now send the encrypted ZIP file via email or other insecure transmission method. You can also give a short instruction in how to open the ZIP file and that the password will be sent via another communication channel.
Share ZIP password via another communication channel.
You should send the password via another communication channel to the recipient.
Open and decrypt password protected ZIP file.
The recipient can now open and decrypt the ZIP file by entering the shared password. This is done with the companion UNZIP utility or a similar built-in utility.
$ unzip confidential.zip
Archive: confidential.zip
extracting: confidential.txt
Enter password:
$ cat confidential.txt
Dear Lightman, your password on the WOPR server has expired and has been changed to Pencil.
This is the procedure for how to fix “X-Authentication-Warning” and “owned process doing -bs” in email headers by configuring trusted users of local submission to Sendmail. Tested with Sendmail 8.18 on FreeBSD 13.5 and 14.3. Published 2025-10-29.
This is the procedure for how to install WireGuard tools and Mullvad VPN on FreeBSD. Tested with WireGuard tools 1.0 on FreeBSD 14.3 on 2025-10-23.
Install WireGuard tools for FreeBSD.
If not installed, then install the WireGuard kernel module and utilities. It comes with the port wireguard-tools.
# pkg install wireguard-tools
Load WireGuard kernel module.
Load the WireGuard kernel module. Configure FreeBSD to load it at boot.
# kldload if_wg
# sysrc kld_list+="if_wg"
Install Mullvad VPN WireGuard configuration for Linux and FreeBSD.
FreeBSD is now ready to create the WireGuard tunnel and just needs a configuration file from Mullvad VPN. Go to the account page, generate a WireGuard key and generate a configuration file for Linux and FreeBSD. The result is a compressed archive, that contain one or more configuration files. In this example, the Danish exit servers are installed into the local WireGuard directory. The file names will be used later.
The WireGuard utility can now create and bring up the WireGuard network interface for FreeBSD. It will also load the private key and configuration into the interface. It will assign an internal Mullvad VPN tunnel IP address. It will adjust MTP for UDP encapsulation to avoid fragmentation. It will change the local DNS resolver to avoid DNS leaks. It will add routes, which consist of a clever routing split. In this example, the dk-cph-wg-401 is tested.
# wg-quick up dk-cph-wg-401
[#] ifconfig wg create name dk-cph-wg-401
[#] wg setconf dk-cph-wg-401 /dev/stdin
[#] ifconfig dk-cph-wg-401 inet 10.73.13.37/32 alias
[#] ifconfig dk-cph-wg-401 mtu 1420
[#] ifconfig dk-cph-wg-401 up
[#] resolvconf -a dk-cph-wg-401 -x
[#] route -q -n add -inet 0.0.0.0/1 -interface dk-cph-wg-401
[#] route -q -n add -inet 128.0.0.0/1 -interface dk-cph-wg-401
[#] route -q -n delete -inet 146.70.13.37
[#] route -q -n add -inet 146.70.13.37 -gateway 192.168.1.1
[+] Backgrounding route monitor
If the WireGuard interface should load automatically at boot, then configure it.
This page is a short introduction to numeric and symbolic mathematics in Maxima on FreeBSD.
What is Maxima?
Maxima is an interactive environment for numeric and symbolic mathematics. It does differentiation, integration and solutions of equations. It plots 2 and 3 dimensional graphics.
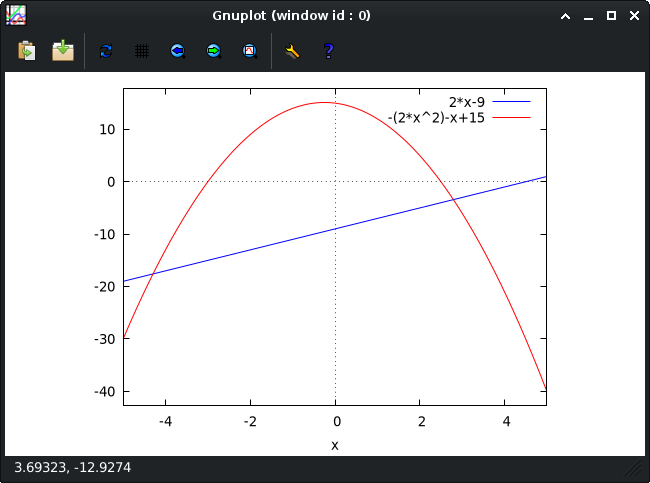
Define 2 functions y1 and y2, where y2 is of 2nd order. Set decimal precision. Solve their intersections and display in decimal number. Differentiate y2. Reference the result with % and evaluate it for x at -1. Plot their intersections.
$ maxima
(%i1) y1(x) := 2*x-9;
(%o1)                          y1(x) := 2 x - 9
(%i2) y2(x) := -2*x^2-x+15;
                                         2
(%o2)                      y2(x) := - 2 x  - x + 15
(%i3) fpprintprec: 2;
(%o3)                                  2
(%i4) float(solve( y1(x) = y2(x), x ));
(%o4)                        [x = - 4.3, x = 2.8]
(%i5) diff( y2(x), x );
(%o5)                              - 4 x - 1
(%i6) ev( %, x=-1 );
(%o6)                                 3
(%i7) plot2d( [ y1(x), y2(x) ], [ x, -5, 5 ] );
(%i8) quit();
This is the procedure for documenting input commands and output on the console, terminal or in shell to a text file with the default typescript utility SCRIPT.
What is SCRIPT?
SCRIPT is a default FreeBSD and UNIX utility, that makes a typescript of a terminal session. It works on the console, on terminals and in a shell. The typescript is stored in a text file, that serves as documentation later.
Make typescript with SCRIPT.
In this example, input and output is written to the script text file test.txt for later documentation.
$ script test.txt
Script started, output file is test.txt
$ date
Fri Sep  5 13:52:51 CEST 2025
$ freebsd-version
14.3-RELEASE-p2
$ exit
Script done, output file is test.txt
Additional input and output can be appended to the script. This avoids overwriting the initial script.
$ script -a test.txt
Script started, output file is test.txt
Review typescript from SCRIPT.
The script can later be reviewed with default utilities or even replayed by SCRIPT itself.
$ cat test.txt
Script started on Fri Sep  5 13:52:48 2025
$ date
Fri Sep  5 13:52:51 CEST 2025
$ freebsd-version
14.3-RELEASE-p2
$ exit
Script done on Fri Sep  5 13:53:13 2025
Manual for SCRIPT.
See the manual for features, such as realtime playback and similar features.
This is the procedure for changing the GEOM ELI (GELI) passphrase (password) on encrypted disks. This includes multiple disks in stripe or RAID with FreeBSD and ZFS-on-Root. Tested on FreeBSD 14.3. Updated 2025-10-11.
GELI password and encryption.
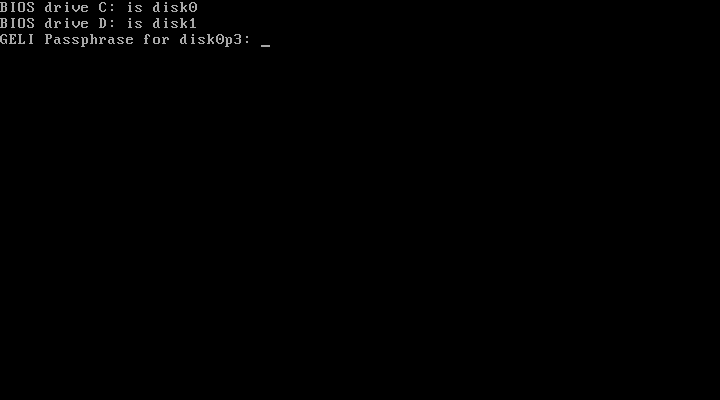
The default install of FreeBSD offers full disk encryption of one or more disks with GELI. The full disk encryption is seamless and simple to use. The user simply needs to type in the password on boot. If the password is correct, then the computer boots FreeBSD.
GELI passphrase prompt during boot on FreeBSD.
During the installation of FreeBSD, GELI generates a random master key for each disk. The master key is different on each disk. The master key is not written anywhere else than on the disk. The master key is used to encrypt data.
The GELI password is not used directly for encryption. The password is used to derive a key-encryption key (KEK) for each disk. This is also known as a user key. The user key is an encrypted copy of the master key for the disk. The same password is by default used for each user key. This is why the same password can decrypt several disks at boot.
The FreeBSD implementation of GELI support the use of an additional user key for each disk. This means, that 2 different passwords could be used. The user key does not have to be assigned to a password. It can also be assigned to a key file or both.
Backup before attempting to change password.
As always, it is adviced to have a backup of the file system, before attempting to change the password for an encrypted file system. It is also important to be certain, that the file system can be restored. Any mistake can brick the computer in an instant.
Choosing a new password.
The GELI password prompt does not in itself protect the system against brute force attacks with delay, rate limiting, lock-out nor similar protection. Instead, when the password is given, GELI applies a large number of hash iterations. This is by default tuned, so it takes an amount of time, that slows brute force down by several orders of magnitude.
For this reason, the password should meet a good balance between being a strong password, a human-friendly password and a keyboard safe password. It is important to know, that a simple password from a dictionary, such as “Pencil” in the famous movie War Games, is not a strong password and could be cracked by an offline GPU cluster.
The strengh of a password is measured in entropy, which is the amount of predictable possiblities. Low entropy can be hacked in minutes. High entropy could be impossible to hack with current and future computer power. I suggest an entropy of 100 bits or more for a GELI password. 100 bits of entropy is astronomically strong.
A strong password includes non-dictionary letters, numbers and special characters, that can be memorized. The password should also be safe, so it can be typed on a default keyboard layout. The following examples include non-dictionary letters, numbers and special characters, that can be memorized, while also being keyboard safe.
Changing the GELI password, that is used to decrypt each disk, is done by using the GELI utility.
In this example, the machine has a Root-on-ZFS file system, that is stored on 2 disk partition components in stripe and registered as ada0p3 and ada1p3. The new password is written to the file newpassword.txt. The new password is then used to generate a new user key for each disk. The user key slot, that was used to decrypt, is assumed. This is by default number 0.
# geli status
# vi newpassword.txt
# geli setkey -J newpassword.txt ada0p3
# geli setkey -J newpassword.txt ada1p3
The GELI password has now been changed. The old password can no longer be used to decrypt the file system.
Adding an extra GELI password.
I would generally not advice adding an extra password nor using several GELI passwords. I can imagine, that an external system administrator might be assigned one, or, on critical systems, where a GELI password change could be performed without deleting the original key, until the new key is tested to work. This is also true, if the new password also requires a keyfile.
In this example, the machine has 1 disk partition, that is registered as ada0p3. The name was found with the GELI utility. The extra password is written to the file extrapassword.txt. The file is used to generate a new user key in slot 1 for the disk. The password and user key in slot 0 remains unchanged.
The extra GELI password has now been added. The extra password in slot 1, and the password in slot 0, can be used to decrypt the file system.
Deleting a GELI password.
The GELI utility can delete a GELI password. This is done by overwriting the user key. This is also known as destroying it. In this example, the GELI password and user key in slot 1 is destroyed. If the system is decrypted and running, then the current password is not required.
The GELI utility can be used to check, if user key slot 0 is in use, user key slot 1 is in use or user key slot 0 and 1 (both) is in use. If the result is 0x01, then user key 0 is in use. If the result is 0x02, then user key 1 is in use. If the result is 0x03, then both user keys are in use.
It is important to know, that a backup of GELI metadata for a disk, can be used to decrypt that disk. This is even true, if the password was changed on the disk. The reason is, that the master key never changes. Only the key-encrypted copy changes.
I do not recommend the use of GELI metadata backup files. Instead, I recommend, that an external file system backup is always available. There is a reason, that metadata corrupts. It usually means a new disk. And that means a fresh install and a restore.
As a part of my general interest in time management, I wanted to take a look into the default calendar on UNIX and Linux systems. Its name is CALENDAR, which is a reminder service, that is used on the console. It basically reads one or more calendars and lists events, that fall into the specified date range.
What is CALENDAR?
CALENDAR is a reminder service, that is installed by default on FreeBSD, UNIX and Linux operating systems. CALENDAR offers simple, versatile, effective and secure time management for systems administrators and users. CALENDAR is based on text files, which makes it easy to update, synchronize and backup. The UNIX calendar reminder service is highly fleksible and easy to combine with other default UNIX utilities. You might even find it to be superior to modern calendars.
$ calendar
Aug 20 	Weather forecast says 11-17 °C 💧
Aug 20* Daily coffee meeting with David Lightman at 15:00
Aug 20  Patch WOPR mainframe in data center
Aug 20  Simulate first-strike on WOPR
Aug 20  Change password for listing games on WOPR
Calendar files
The CALENDAR reminder service uses one or more calendar files. Much like the good old days, when you would have one or more calendars. You might have a private one for personal events, one for recurring birthdays, a shared one for family events and a shared one for project events. Each calendar can hold tasks, recurring events.
By default, CALENDAR will search for a calendar file in the user home. If that is not found, then it will look for a calendar file in the hidden dot calendar directory and the following shared directories. The default name for a calendar is “calendar”.
I recommend, that the hidden calendar directory is used. This will protect your calendars from accidental deletion. In this example, a set of calendars are created.
The calendar file format is text based and consist of a list of dates and description. These are separated by a tab. Other calendars can be included.
$ nano -T 12 ~/calendar/calendar
#include <calender.archived>
#include <calender.recurring>
#include <calendar.freebsd>
#include <calendar.weather>
10/2        2nd day of October
2025/9/15   15th day of September 2025
Thursday    Every Thursday
15 *        Every 15th day
July        Every 1st day of July
04/TueLast  Every last Tuesday in April
Fri+1       Every 1st Friday of every month
Using CALENDAR
If you want to see todays calendar events, then run CALENDAR without any arguments. CALENDAR will read the calendar, and any included calendars, and output todays events. You might want to format the date to your local preference in the shell configuration or on the command line.
$ calendar
Aug 20* Daily coffee meeting with David Lightman at 15:00
Aug 21  Patch WOPR mainframe in data center
By default, next day or weekend will also be listed. This is to avoid overlooking a post midnight event. This feature can be disabled.
$ calendar -W 0
Aug 20* Daily coffee meeting with David Lightman at 15:00
If you use a wrapper script or shell alias, you might want to show time and date along with the events.
$ date "+%H:%M %A %d %B %Y"; calendar -W 0
13:37 Wednesday 20 August 2025
Aug 20* Daily coffee meeting with David Lightman at 15:00
Format output to program
Because the calendar outputs plain text to the console, you can pipe the output through formatting utilities. In this example, the first columns are removed and the events are sorted. This can be used, if your events has a leading time and you want a program for the day. Events with no time will be listed as all-day events below the program.
$ cat .calendar/calendar
Aug 20  09:00 Meeting with management
Aug 20  10:00 Upgrade chess game on WOPR
Aug 20  12:00 Lunch with Lightman
$ calendar -W 0 | cut -c9- | sort
09:00 Meeting with management
10:00 Upgrade chess game on WOPR
12:00 Lunch with Lightman
List events for specific date
In this example, the events for a specific date is listed.
$ calendar -W 0 -t 21.08.2025
Aug 21* Daily coffee meeting with David Lightman at 15:00
Aug 21  Test Tic-Tac-Toe game on WOPR
If you want to list the events for a date, that is an amount of days away from todays date, you can use the DATE utility for relative argument. In this example, the events for tomorrow are listed.
If you use a wrapper script or shell alias, you might want to show date along with the events.
$ date -v+1d "+%A %d %B %Y"; calendar -W 0 -t $(date -v+1d +%d.%m.%Y)
Thursday 21 August 2025
Aug 21* Daily coffee meeting with David Lightman at 15:00
Aug 21  Test Tic-Tac-Toe game on WOPR
List events for date range
If you want to see all events, that is planned days ahead in time, or happened days back in time, you can use the ahead argument -A and back argument -B. They can be also combined for a date range.
$ calendar -B 1 -A 3
Aug 20* Daily coffee meeting with David Lightman at 15:00
Aug 21* Daily coffee meeting with David Lightman at 15:00
Aug 21  Test Tic-Tac-Toe game on WOPR
Aug 22  Patch WOPR mainframe in data center
Search for past and future events
In this example, the output will be past operations on WOPR in the past 90 days.
$ calendar -B 90 | grep WOPR
Jan  1  Confirm time on WOPR
Aug 19  Change password for Lightman on WOPR
Aug 21  Test Tic-Tac-Toe game on WOPR
In this example, the output will be planned operations on WOPR in the next 3 days.
$ calendar -A 3 | grep WOPR
Dec  1  Evaluate simulation of run-away situation on WOPR
Documentation for CALENDAR
The manual is very well written.
$ man calendar
Default system calendars
On FreeBSD, UNIX and Linux operaing systems, there can be default system calendars, which are included by default or can be included manually. FreeBSD offers a a calendar with birthdays of FreeBSD contributers. Ubuntu offers several calendars, such as historic events.
$ ls /usr/share/calendar/calendar*
$ grep Percival /usr/share/calendar/calendar.freebsd
02/24 Colin Percival <> born in Burnaby, Canada, 1981
Todays events at login
If you would like, that each user gets todays events at the login console, then configure it in the global shell configuration. In this example, the SH is configured.
# nano /etc/profile
events=$(calendar -W 0 2> /dev/null)
if [ -n "$events" ]; then
  echo "$events"
fi
Todays events via email
If you want an automatic daily email with todays events, you can configure CRON to do this. In the following example, CRON on a FreeBSD server is configured to automatically send todays events to each system user.
If you want to include todays weather forecast, for today and the next days, you can use an online service, that generate ICS calendar files and convert them to CALENDAR format.
In this example, a special URL to the weather forecast was generated on the brilliant website of Meteomatics, which is a free service. The weather forecast comes as a file in ICS format. This file contains the weather forecast for each day through 15 days. Python is used to convert it to CALENDAR format and saved as an optional calender, that local users can include in their calendars.
# nano ~/bin/meteomatics
#!/usr/bin/env python3.11
from icalendar import Calendar
from datetime import datetime
import re
with open("/tmp/meteomat.ics", "rb") as f:
  cal = Calendar.from_ical(f.read())
for component in cal.walk("vevent"):
  dtstart = component.decoded("dtstart")
  if isinstance(dtstart, datetime):
    dt = dtstart.date()
  else:
    dt = dtstart
  desc = component.get("description")
  if not desc:
    continue
  temps = [int(x) for x in re.findall(r"([-]?\d+)°C", desc)]
  if not temps:
    continue
  tmin, tmax = min(temps), max(temps)
  rain = "💧" if "💧" in desc else ""
  print(f"{dt.month}/{dt.day}\tWeather forecast says {tmin}-{tmax} °C {rain}")
CRON is used to update the weather forecast calendar automatically. In this example, it happens daily at 13:37.
The calendar can be synchronized between devices and systems with a synchronization utility, such as RSYNC or Unison.
In the following example, Unison is installed and configured for synchronizing the calender via SSH to a remote UNIX system, that also has Unison installed.
The options prefer, auto and batch are used, so conflicts are solved automatically. An example of a conflict could be, that local and remote calendars were changed. Unison can not merge changes.
$ man unison
     unison – a multi-platform bi-directional file synchronization tool
     unison profilename [options]
     batch   When this is set to true, the user interface will ask no
             questions at all. Non-conflicting changes will be propagated;
             conflicts will be skipped.
     root xxx
             Each use of this preference names the root of one of the replicas
             for Unison to synchronize. Exactly two roots are needed, so
             normal modes of usage are either to give two values for root in
             the profile, or to give no values in the profile and provide two
             on the command line. Details of the syntax of roots can be found
             in Section “Roots” in the manual. The two roots can be given in
             either order; Unison will sort them into a canonical order before
             doing anything else. It also tries to `canonize' the machine
             names and paths that appear in the roots, so that, if Unison is
             invoked later with a slightly different name for the same root,
             it will be able to locate the correct archives.
Send CALENDAR to devices with SCP
In the following example, the events for the next 21 days are sent via SCP to a remote device, such as an SSH server on port 1337 on an Android phone, and stored as a text file. The directory on the remote device is the default, which can be configured on the SSH server on the remote device.